
As I work on websites and hook up new hosting and migrate customers, the issue of getting reliable outgoing email is a constant issue. Not all hosting companies have built-in email services like they used to. Running an email system is a lot of work, and you have a constant battle with spam and abuse, IP reputation, deliverability issues and so on. Some hosts like WPEngine don’t have email at all. Some hosts like SiteGround and InMotion Hosting do have email services but they don’t want you using their outgoing email relay unless you are actually using those services.
If you host your email with one provider, such as Google or Microsoft, and you host your website on a service like InMotion Hosting, you shouldn’t be sending email from the website using their servers, because proper validation can’t happen with things like DKIM validation.
The ultimate solution for email in WordPress, across any host, is to use your own SMTP sender and do not rely on the hosting company relaying your emails perfectly. Without proper validation; SPF, DKIM, DMARC, these emails will end up being dropped, or sent to spam 100% of the time.
Using your email provider
If you use a dedicated email provider, you should be able to use them for your outgoing emails. Nearly every provider will allow you to make use of an email account for SMTP sending. There may be cases where this is disbled or unavailable or could be an addon purchase.
How this works is that you would set up a special user just for sending emails. Traditionally you might create “noreply@” or “info@” or “admin@”. You would declare these emails as unmonitored and try to avoid users clicking “reply” and answering back to them. They could be automatically dropped or auto-cleaned.
These days, it is not recommended to create black hole email addresses and drop all the replies. After all, those replies could be customers and leads right? If at all possible, you should send email from an address where it is acceptible to receive replies and someone will be checking them. It should still be generic though. You don’t generally want to send all your emails from “joe@”. Poor Joe! He’ll be dealing with replies to that address forever.
Instead, use info@ or admin@ or mywebsitename@ and assign people to check this account, or forward all the replies to other people.
Once you’ve established this sending account, you will be able to get the SMTP details from the email host. It will have a host such as “mail.example.com” or for Zoho it would be “smtp.zoho.com”. Then it will give you what port you can use, usually 465 for SSL or 587 without SSL and with TLS. Then the email address and its related password become the username and password to the email server. There is sometimes a setting such as “requires authentication?” which must be set to “yes” as this tells the system it will need that username and password to log in.
Here I am adding Zoho using the FluentSMTP WordPress plugin.
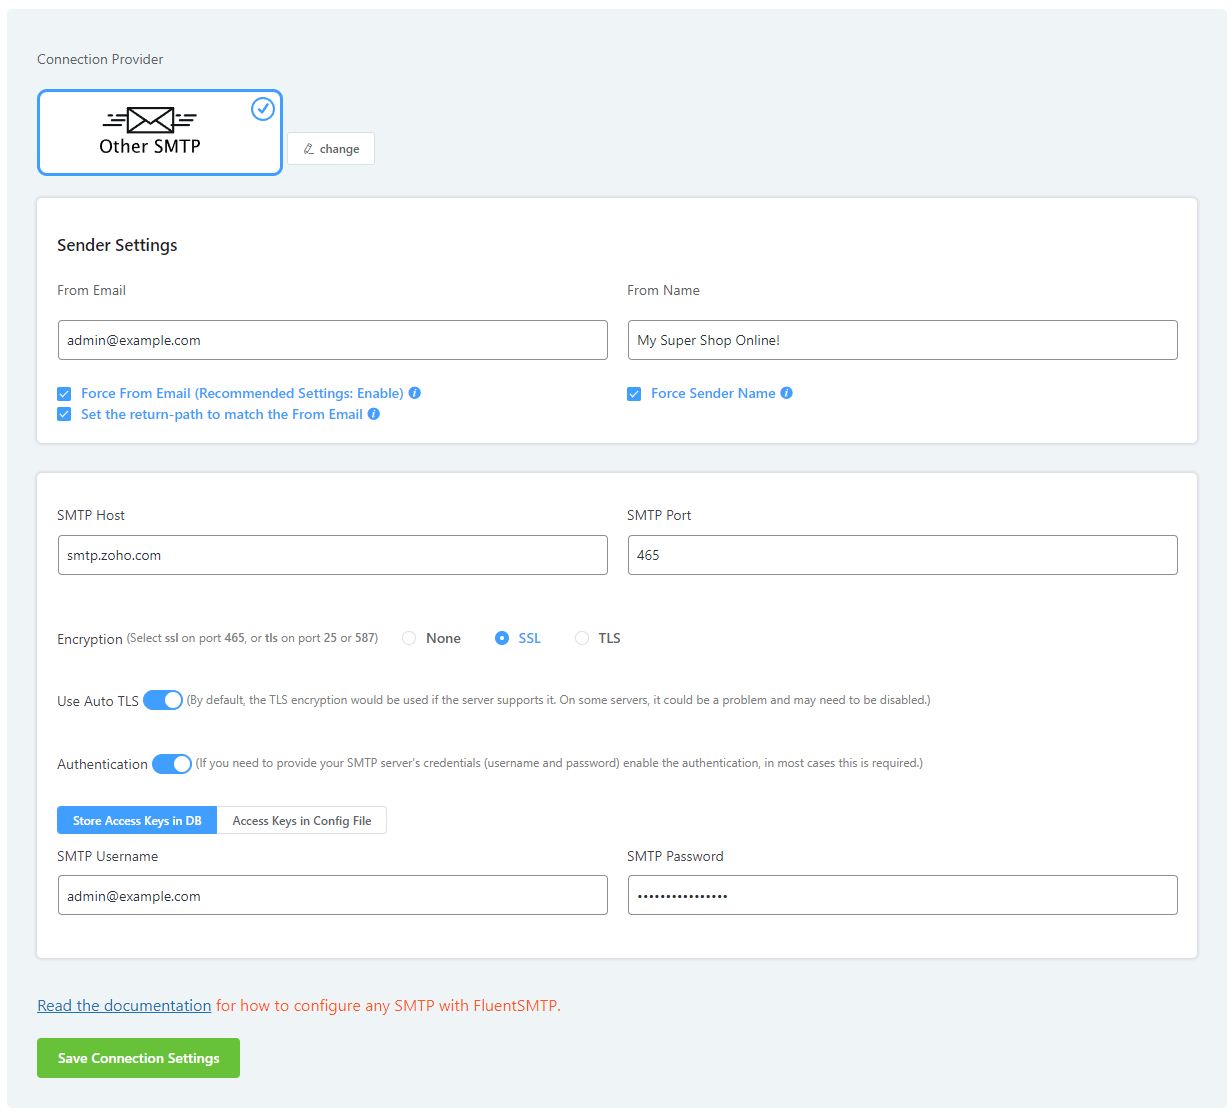
Notice the “From Email” will be the same as the username. I have port 465 selected along with SSL because this is what Zoho suggests. Authentication is checked because I need to enter the username and password to use this provider. At the top it says “Other SMTP” because Zoho is not one of FluentSMTP’s built-in connections.
Using your hosting company
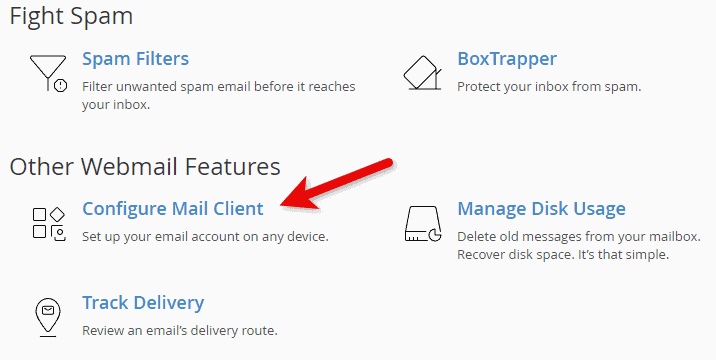
For hosting companies that have email abilities built-in, you can use their server just as we did with Zoho before. Ideally this means your MX records in DNS are also pointing to this host and you are using them for your normal email as well as your sending account. cPanel is a very common control panel that has an email subsystem. Here is an example where we have three accounts created beside the built-in system user:

Admin@ is used for outgoing emails, and webmaster@ is also used from one of their website projects. If you click the “Check Email” button, it should take you to a landing page with a handful of options and settings for the email:
Then it will reveal the necessary settings:
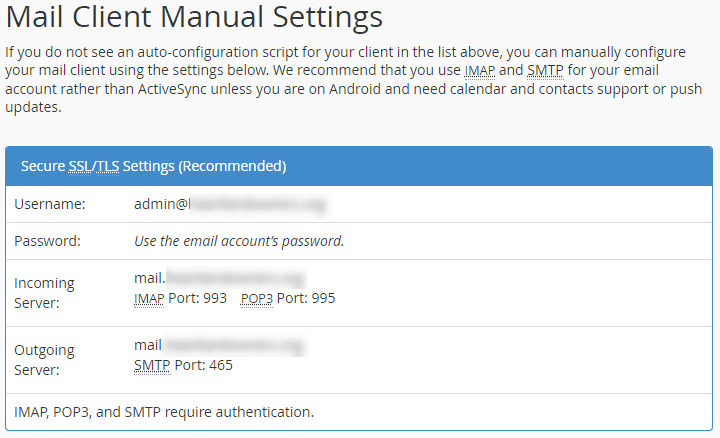
For “Outgoing Server” it tells you the host and port needed for SSL settings, and that this server requires authentication, meaning you must enter the username and password to use it. The outgoing and incoming server names might be different or they might be the same, but for our purposes we are not using the incoming server for POP3 or IMAP. We are only making use of the SMTP relay.
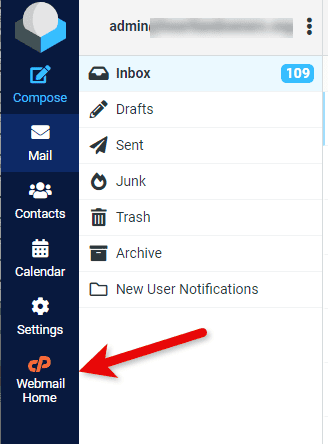
Sometimes in cPanel if you click “Check Email”, you won’t get the configuration screen but instead it will jump straight into the Roundcube email app. If this happens, you will have an icon in the left menu to return to the configuration options.
Using your host even if you don’t use their email services
There are situations where you have your MX record pointed to a specific email provider, and you cannot use them for this purpose, and yet your hosting company still allows outgoing email. This is actually quite common. Sometimes people use email from their internet provider or some local service provider or any provider that has you point your MX records to them. In some cases a user only has a free email from Google or others.
If you only use a free email such as Gmail or Outlook, then you can still technically point your MX records to your host (if they provide email services) and then proceed with the previous instructions to set up an email account. When that is done, you can simply have all email that goes to this address be forwarded to your Gmail so you don’t have to check it manually.
If your MX records point to a provider and you cannot use this provider as an SMTP relay for whatever reason, then you have to check if your web host still allows outgoing email relay. One such provider is GoDaddy. In fact, GoDaddy is so strict about email going through their servers, they they require you to use their SMTP relay and cannot use your own provider at all! See their article Send form mail using an SMTP relay server for details. They say you don’t even need an SMTP tool like FluentSMTP but instead should relay on the standard PHP mail functions which is how WordPress works by default. Ultimately this means that if you host on GoDaddy, for one thing, you cannot use a proper SMTP sender, and secondly, you need no special configuration at all, you can just install WordPress and it will send emails naturally. By the way, I do not like this system at all since we may actually want to use our own SMTP provider, but they don’t allow it.
Other hosts may allow the outgoing email from their servers, but you will need to address the SPF record at the least. Let’s say your MX records point to Microsoft and you won’t be using them for email relay. Your host is a provider that offers email though you don’t use it, such as SiteGround or InMotion or Namehero or numerous others. All you have to do here is let WordPress send the email the normal way, while setting your outgoing email to something that matches the domain of the website. If your website is example.com, you should set your “from” address to be “something@example.com”. This is important because if your site is example.com, you cannot set your outgoing email to be “mycoolestemail@gmail.com”, because you have no control over gmail.com and your host doesn’t have authentication to send emails on behalf of gmail. Or to put another way, SiteGround is not an authorized email sender for Gmail addresses. There is no connection between the two.
You can essentially just make up this address, it doesn’t have to exist at all, as long as it matches your domain, so you can put “noreply@example.com” if you want. Or if you want to be able to check this email, use an email from your actual email provider, as long as it matches the domain, such as “help@example.com”.
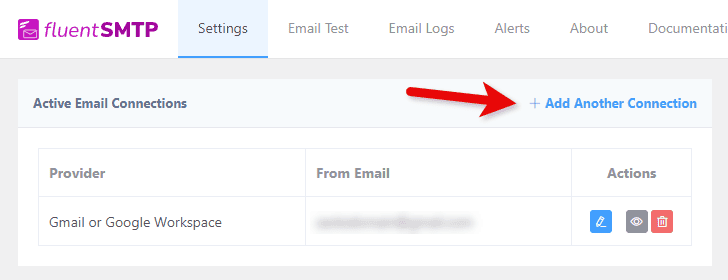
Now that you’ve established a proper email address to use, you will want to install an SMTP plugin such as FluentSMTP mentioned before. This is a free plugin that helps with SMTP connections, and stores a log of all outgoing emails, and lets you send test messages. It will take over all outgoing emails through itself so that every different plugin or tool isn’t trying to send emails in its own way.
In FluentSMTP, click Settings and click the link to add a new connection.
On the following screen, you can use the “php” option, which simply means to use the normal PHP mail() functions as it would anyway without FluentSMTP installed.
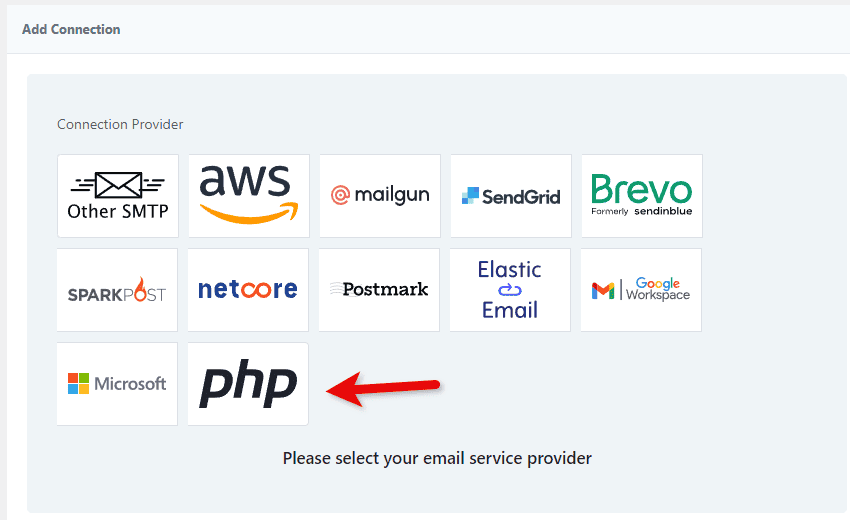
You can’t use “Other SMTP” here because you don’t technically have any “real” email user to use. If you aren’t sending from your real email provider, then you don’t have a password, we need to use the local email system of the host.
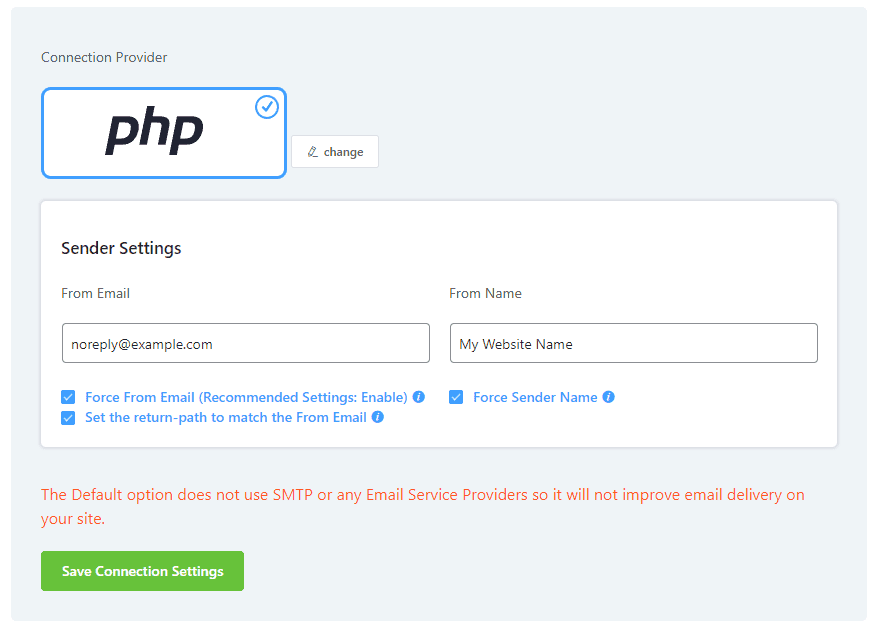
The settings on the next screen are simple, it’s just the “From” email you want, and the “From Name” which is what the end user will send as who the email is coming from. It should be your website’s name or company name.
If you set the “Force…” options, it will override the email and name that may be set by the plugin or tool that is sending the email. For example, if WooCommerce is sending an email, it may have its own settings about those, but here, Fluent will override all outoing messages to use these settings. It’s usually a good idea.
The return-path is what would happen if the email is bounced and gets returned. If you are using a fake email, you may want to set this to a real email if those bounced messages may be important to you. Let’s say you are using a made-up fake email like “store@” and a user tries to buy something but enteres their email wrong. The outgoing emails with their receipt would bounce because the email doesn’t exist. You might end up eventually with a customer upset because they never received any notices or receipt or welcome message or registration details or anything. If you are receiving the bounce to a different proper email, that could help discover the issue.
Now that you have your (real or fake) email entered, it will be very important to make sure your SPF record is allowing your host as a valid sender for the domain.
If your site is example.com, and you’ve chosen a real or fake email of the same domain such as noreply@example.com, this suggests that you own this domain and have control over its DNS. You have one TXT record in DNS to enter an SPF value. This value determines what hosts are “allowed” to send emails for example.com. Since you own this domain, you can adjust the SPF. Mail servers will trust that this was done on purpose and they’ll deliver the mail. If you don’t allow your host, then it would be considered a spoof of the domain. Think about it, you could tell FluentSMTP “when we send emails, pretend to be “the-president@unitedstates.gov” and use “Official White House” as the from name. What happens when a user receives this?
You are pretending to send mail from “unitedstates.gov”, but you don’t own this domain, so you can’t set the SPF to allow your host and your WordPress install to send emails from this domain. The email would be blocked, sent to spam or deleted directly by receiving email servers.
Every host will have a different SPF value they would have you use. Here are a few hosts as an example:
SiteGround: include:_spf.mailspamprotection.com [info]
Bluehost: include:websitewelcome.com [info]
WPEngine: include:relay.mailchannels.net
GoDaddy: If email is set up with Professional Email, Microsoft 365 from GoDaddy, Linux Hosting, Gen 4 VPS & Dedicated Hosting, or Media Temple Mail, SPF must be include:secureserver.net.
InMotion Hosting: include: include:smtp.servconfig.com
Outlook/Microsoft Email: include:spf.protection.outlook.com
A very basic SPF value might be: “v=spf1 a mx include:websitewelcome.com ~all”. A couple things to note: the “v=spf1” is the version, the “a” and “mx” by themselves means that whatever is found in an “A” record and whatever is found in the “MX” records are also allowed (these are not always needed). Then there is a list of any “include” statements pointing to domains which are the email servers you are allowing. Sometimes you’ll see IP addresses such as “ip4=111.222.333.444”.
The “~all” at the end is very important and defines what to do if the sending server is not found in this record. The tilde means that the email could still be delivered but considered as spam. If it were “-all” with a dash, it would signal to drop and reject any emails. And the least secure is “+all” which basically means any server can send emails as if it’s from your domain.
There can be only one SPF record, it must be all lowercase, and must have the “all” setting at the end. You also cannot have more than 10 DNS lookups within your record. If you require more than 10 lookups due to how many services need to send email for you (CRM, marketing tools, servers, etc), you can use so-called SPF flattening services to combine everything into fewer lookups.
Here is how the SPF record looks for one of my domains: “v=spf1 +a +mx include:zoho.com include:spf.mailjet.com ~all”. Here I’m including Zoho’s SPF and Mailjet’s SPF because both may be used to send emails on behalf of my domain.
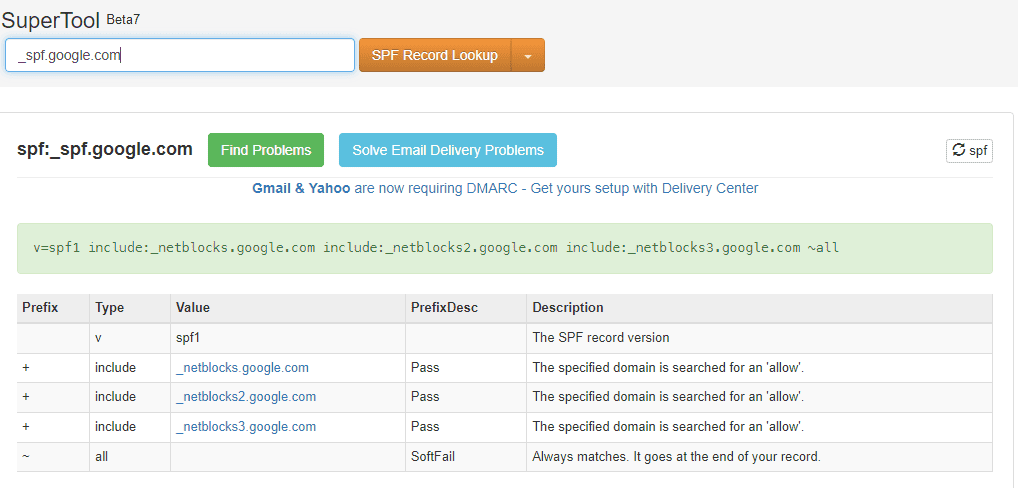
If you want to see what your SPF record currently is, go to MX Toolbox SPF Record Lookup. Type in your domain without any subdomains or “https” or “www” or extra slashes, e.g. “example.com” not “www.example.com/” and so forth. It will show if the SPF record is missing or has any problems.
Here is Google’s SPF record used for “gmail.com”:
You havek to update the SPF record at your DNS provider. This is usually the same provider where you purchased the domain in the first place. I personally prefer to use separate providers for registration and DNS management. You can find out who your DNS provider is by looking up your nameserver settings are. Using the MX Toolbox whois lookup tool, enter your domain and then look for the “Name Server” values, this should give you a clue. If your host is the DNS provider, the DNS settings themselves will be edited in their DNS area or their control panel such as cPanel.
Once you have a valid SPF that allows your server or host to send emails on behalf of your domain, you can go back in FluentSMTP and use the “Email Test” feature to send yourself a message. It’s important to look at this message after it arrives to make sure the SPF was valid. The email might not go to your inbox, it may still go to spam. Some email clients like Zoho will pop up a warning saying we can’t trust the email if it has bad SPF or other settings. Your email client should let you “view source” or “view headers” of the email to see the details.
If you can copy the source of the message, then you can use the header analyzer also from MX Toolbox. https://mxtoolbox.com/EmailHeaders.aspx
Using an email relay service
Your last option for robust email sending from WordPress is to use a 3rd party dedicated email relay service. This is not a fully featured email service like Google or Microsoft or Zoho, instead, they specialize in sending mail, and sending bulk mail. They don’t receive mail or receive replies. Those would return through your normal email handler. It’s perfectly valid to use a relay service alongside a standard email provider, they don’t step on each other’s toes at all.
These services can be cheap, but they are usually designed for bulk senders or websites that send a ton of messages per day such as a busy web forum or social site or marketing tool. As an example, I use one of these on a web forum because forums tend to send out a lot of notifications to all their users about new posts, private messages, subscribed thread activity and so forth. You would not want to use your standard email address or even a hosting companies email system for this type of bulk email.
Even though they are designed for bulk mail and marketing and newsletters and such, they have no problem sending one email a day either. Most have free plans which is what I’ll detail next. The free plans have a certain daily and/or monthly limit with other restrictions.
When you sign up for these, they may not even require a credit card, and you will get standard SMTP details like a host, username, password, and port. Some of these will have connectors built in to tools like FluentSMTP, making it even easier to use.
The following services are those with the best free plans, in my opinion. They will suffice for most any business website that has reasonable traffic and a web form or two. If you need to send less than a couple thousand emails a month, these will be perfect.
Here they are in no particular order, and there are no affiliate links. Pricing can always change, or you may get discounts by purchasing yearly instead of monthly, or there could be discounts and coupon codes happening, etc. And I’ve seen the features of free tiers change over time as well, so it’s best that you compare a few of these yourself and make sure they will do what you need.
Some services didn’t make the list due to very small limits, or overly huge price jumps to the paid tier, or some other no-no issue such as placing advertisements or branding into my emails.
Mailjet
I’ve used Mailjet for years and never had an issue with them. They will send up to 200 emails/day and up to 6000/month on the free tier.
One benefit of Mailjet is that you can hook up multiple different sending emails and domains, so you could potentially use one account as your sender for many domains.
If you go over their limits, the next plan bump is about $15/month.
SendGrid
This popular service can send up to 100 emails/day (roughly 3000/month). They have a built-in connector to many tools to make it easier to set up. I believe you can only authenticate one domain for sending.
If you go over limits, the next tier is $19.95/month.
Brevo
They will send 300/day which is roughly 9000/month.
One benefit with Brevo is they can store your logs a lot longer than other free options which may only store a log for a day or so.
Next paid tier is $15/m.
Mailersend
The free plan allows up to 3000 emails/month and 1000 API hits/day. I assume an “API hit” is roughly the same as sending one message, but it might not be.
A nice thing about Mailersend pricing is that you can add on to the free plan by purchasing another1000 emails for $1.00. So the price can grow gradually as you need it.
A downside is that the free plan has only one sending domain, so you can only use it when sending from that domain. This may also be a limit on the other services but some don’t mention this limit up front.
The next monthly paid tier is $30/m.
ZeptoMail
This service is by Zoho who make a lot of nice services and software. This is their specialty email relay service. They follow a unique credit system where a credit costs $2.50 and covers 10,000 email sends. Because you buy the emails as a batch, I don’t think there is a daily or a monthly limit, you simply use up your credits as needed.
The credits last 6 months so if you don’t happen to use them all, you still have to buy another credit. This means the cheapest ZeptoMail could be is $2.50 every 6 months, it’s practically free if you ask me!
If you require more than the free tier of any of the services mentioned, ZeptoMail may be one of the cheapest options for you between 10k and 40k emails.
The first credit after signing up is free, so your first 10,000 block is all yours for 6 months.
SMTP2Go
The free plan is 1000 emails/month with the next tier at just $10, which is cheaper than any of the other starting tiers except perhaps ZeptoMail and Mailersend.
How to choose one
Even though they are all free, you still want to figure out answers to some of these questions if they are relevant to you:
- Will the daily and monthly limit be more than sufficient?
- Do I need to use this on many domains for many sender emails?
- Is there a limit to how many unique emails can receive over time? (Other free services were not added to this list because of such a limit, e.g. only allowing a few people to be the receiver of emails).
- Do they have the proper privacy policy you need regard GDPR and other concerns?
- Is it ok to only have one master user for the whole account? I.e. if you can send using multiple domains, can you have sub-users with access to that domain, or can you segment your limits across subusers and domains etc.
- Does your preferred SMTP tool have a built-in integration with the service? That can make setup a pinch easier. You can see in the earlier screenshot of FluentSMTP that it has connectors for SendGrid and Brevo. But not using these is nearly as easy.
- Deep in the email headers will reveal that the emails come from these services, but that shouldn’t be an issue, there is no reason you would need your emails headers to make it look like emails only come from your own mail server. These services are purpose-built and it’s perfectly normal that your emails would come from such a provider.
After you sign up, just follow the instructions to validate your domain and add the SPF details and other details. Then it can hooked into WordPress. Keep in mind that if you have GoDaddy, they don’t let you use your own SMTP, so these wouldn’t work with them.
If you end up needing help with your website, I do have maintenance retainers, please reach out!